@app.route('/detail/<keyword>') #이 주소로 가면
def detail(keyword):
    # API에서 단어 뜻 찾아서 결과 보내기
    return render_template("detail.html", word=keyword) #detail/ 뒤에 오는 단어를 word로 보냄
Ajax를 보내서 사전 API에서 데이터를 받아오고 HTML에 채워넣는 방법
        let word = '{{ word }}' //워드로 들어온 문자열 끼워넣기

        $(document).ready(function () {
            get_definitions()
        })

        function get_definitions() {
            $.ajax({
                type: "GET",
                url: `https://owlbot.info/api/v4/dictionary/${word}`, //owl봇에 요청을 보내서 ${word} 뜻을 알려줘!
                beforeSend: function (xhr) {
                    xhr.setRequestHeader("Authorization", "Token ed4c16e8cab27f9cf2587dcba3c60d9a2a89a0ee");
                },
                data: {},
                error: function (xhr, status, error) {
                    alert("에러 발생!");
                },
                success: function (response) {
                    console.log(response)
                }
            })
        }
function get_definitions() {
$.ajax({
type: "GET",
url: `https://owlbot.info/api/v4/dictionary/${word}`, //owl봇에 요청을 보내서 ${word} 뜻을 알려줘!
beforeSend: function (xhr) {
xhr.setRequestHeader("Authorization", "Token ed4c16e8cab27f9cf2587dcba3c60d9a2a89a0ee");
},
data: {},
error: function (xhr, status, error) {
alert("에러 발생!");
},
success: function (response) {
console.log(response)
$("#word").text(response["word"])
if (response["pronunciation"] == null) {
$("#pronunciation").text("")
} else {
$("#pronunciation").text(`/${response["pronunciation"]}/`)
}
$("definitions").empty()
let definitions = response["definitions"]
for (let i = 0; i < definitions.length; i++) {
let definition = definitions[i]
let html_temp = ``
if (definition["example"] == null) {
html_temp = `<div style="padding:10px">
<i>${definition["type"]}</i>
<br>${definition["definition"]}<br>
</div>`
} else {
html_temp = `<div style="padding:10px">
<i>${definition["type"]}</i>
<br>${definition["definition"]}<br>
<span class="example">${definition["example"]}</span>
</div>`
}
$("#definitions").append(html_temp)
}
}
})
}
사전 API의 파이썬으로 요청을 보내 데이터를 받아와서 Jinja2로 상세페이지에 채워넣는 방법
한번 페이지를 띄우고 나서, 바뀔 일이 없는 부분에 대해서는 Jinja2 템플릿 언어로 html을 완성해서 보내주기 (Server-Side-Renderring)
@app.route('/detail/<keyword>') #주소 URL의 일부(앞부분만)받아
def detail(keyword):
    #keyword 라는 변수로 저장을 해서 요청을 보내는 URL뒤에 넣어준 뒤, header 정보 안에 내 토큰을 넣어준다
    r = requests.get(f"https://owlbot.info/api/v4/dictionary/{keyword}", headers={"Authorization": "Token ed4c16e8cab27f9cf2587dcba3c60d9a2a89a0ee"})
    result = r.json() #json 형태로 바꿔주기
    print(result)
    return render_template("detail.html", word=keyword, result=result) #detail/ 뒤에 오는 단어를 word로 보냄
result로 보냈으니~
detail.html에서!
단어와 품사를 바꿔주자!
                <h1 id="word" style="display: inline;">{{ result.word }}</h1>
                <h5 id="pronunciation" style="display: inline;">/{{ result.pronunciation }}/</h5>
반복문으로 예문 넣어주기~
        <div id="definitions">
            {% for definition in result.definitions %}
            <div style="padding:10px">
                <i>{{ definition.type }}</i>
                <br>{{ definition.definition}}<br>
                <span class="example">{{ definition.example}}</span>
            </div>
            {% endfor %}
        </div>
만약 발음이 없을 때를 예외처리해주기!
                {% if result.pronunciation %}
                <h5 id="pronunciation" style="display: inline;">/{{ result.pronunciation }}/</h5>
                {% endif %}
예문이 없을 때도 예외처리~
            {% for definition in result.definitions %}
            <div style="padding:10px">
                <i>{{ definition.type }}</i>
                <br>{{ definition.definition}}<br>
                {% if definition.example %}
                <span class="example">{{ definition.example}}</span>
                {% endif %}
            </div>
            {% endfor %}
***owlbot이 보내주는 태그 그대로 처리해주라는 뜻! -> 파이프 사용하기
(예문에 HTML 태그 쓰는 것을 허용하기)
<span class="example">{{ definition.example|safe}}</span>
***깨진 글자 없애버리기!
<span class="example">{{ definition.example.encode('ascii','ignore').decode('utf-8')|safe }}</span>
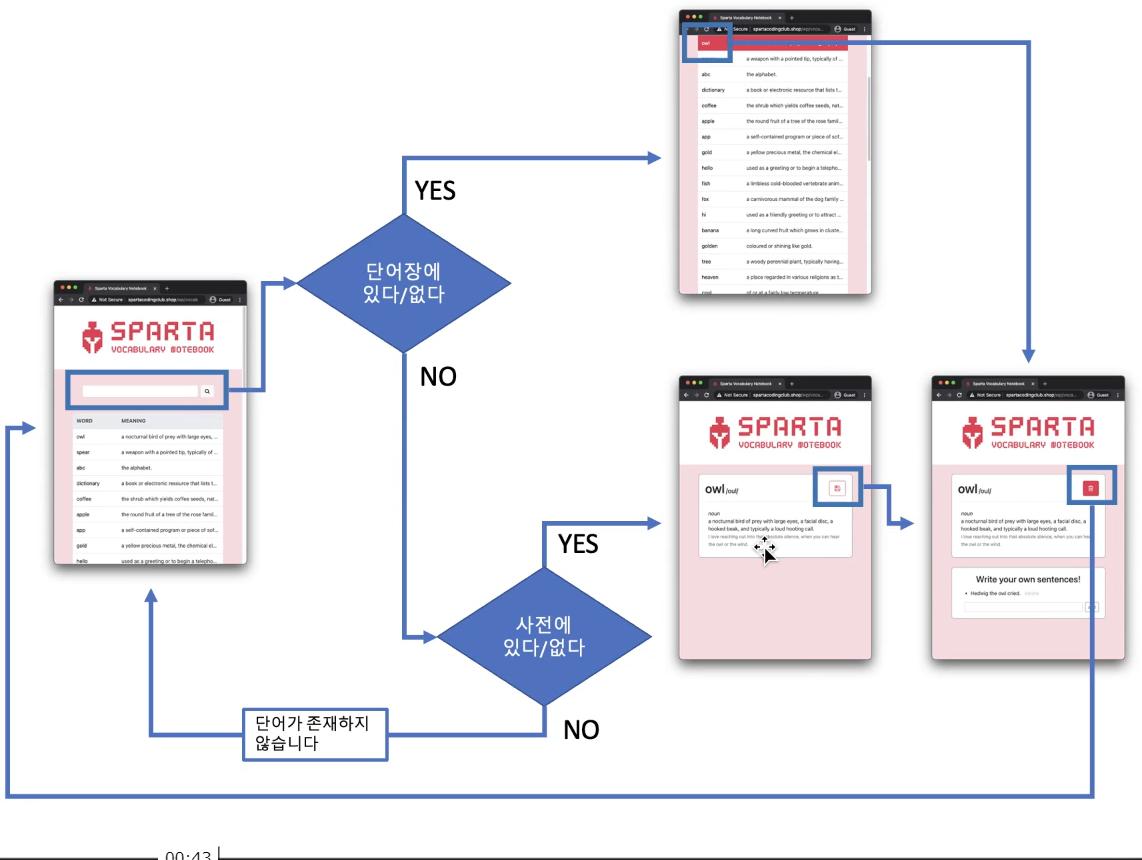
.encode('ascii','ignore').decode('utf-8')단어에 따라 저장/삭제 버튼 숨기기
단어가 새 단어인지, 단어장에 있던 단어인지에 따라 보여주는 버튼이 달라야하죠? 우선 서버에서 status_give라는 이름으로 온 파라미터를 다시 status라는 이름으로 템플릿에 보내줍니다.
status_receive = request.args.get("status_give")
return render_template("detail.html", word=keyword, result=result, status=status_receive)
그럴 일은 없지만, status_give라는 파라미터를 주지 않을 경우를 대비해, 기본값을 "new"로 주도록 하겠습니다.
status_receive = request.args.get("status_give", "new")jinja2를 이용하여 상황에 맞는 버튼이 보이도록 해줍니다.
{% if status=="new" %}
    <button id="btn-save" class="btn btn-outline-sparta btn-lg" onclick="save_word()">
        <i class="fa fa-floppy-o"></i>
    </button>
{% else %}
    <button id="btn-delete" class="btn btn-sparta btn-lg" onclick="delete_word()">
        <i class="fa fa-trash-o"></i>
    </button>
{% endif %}
POST 요청으로 보내고, 서버에서 단어와 뜻을 받아 words 컬렉션에 저장합니다.
@app.route('/api/save_word', methods=['POST'])
def save_word():
    # 단어 저장하기
    word_receive=request.form['word_give'] #post요청이기에 request, word_give로 보내줄게!
    definition_receive = request.form['definition_give']
    doc={
        "word":word_receive,"definition":definition_receive
    }
    db.words.insert_one(doc)
    return jsonify({'result': 'success', 'msg': f'단어 {word_receive} 저장'})
이제, 위의 함수로 요청을 보낼 함수를 detail.html에 만들어주자
        function save_word() {
            $.ajax({
                type: "POST",
                url: `/api/save_word`, //app.py에 만든 save_word api로
                data: {
                    word_give:"{{ word }}",
                    definition_give:"{{ result.definitions[0].definition }}" //detail api에서 파라미터를 가져옴
                },
                success: function (response) {
                    alert(response["msg"]) //단어 저장 성공하면
                    window.location.href="/detail/{{ word }}?status_give=old" //내 단어장에 있는 단어를 위한 페이지로 이동
                }
            });
        }
<button id="btn-save" onclick="save_word()" class="btn btn-outline-sparta btn-lg"><i class="fa fa-floppy-o"
aria-hidden="true"></i></button>
단어 삭제하기
@app.route('/api/delete_word', methods=['POST'])
def delete_word():
    # 단어 삭제하기
    word_receive = request.form["word_give"]
    db.words.delete_one({"word":word_receive})
    return jsonify({'result': 'success', 'msg': f'단어 {word_receive}삭제'})
        function delete_word() {
            $.ajax({
                type: "POST",
                url: `/api/delete_word`,
                data: {
                    word_give: "{{ word }}"
                },
                success: function (response) {
                    alert(response["msg"])
                    window.location.href="/"
                }
            });
버튼에도 온클릭 넣어주자~(귀찮음)
'Today I Learned' 카테고리의 다른 글
| 멜론 차트 / 네이버 이미지 주소 스크래핑 (0) | 2021.10.09 |
|---|---|
| 나만의 단어장 만들기 2 - Jinja2 (0) | 2021.10.08 |
| 서울시 오픈 API - jinja2 사용하여 나타내기 (0) | 2021.10.06 |
| TIL1006 (0) | 2021.10.06 |
| 웹프로그래밍 심화_나홀로일기장 LV2 (0) | 2021.10.06 |
