✔ Lecture.java 파일을 만들어 java 코드로 테이블, 키, 컬럼을 만든다. -> JPA
JPA(SQL을 사용하지 않고도 테이블 CRUD 가능하도록 하게 해줌)는 Repository를 통해서만 사용할 수 있으며,
Lecture.java를 만들어 테이블,키,컬럼 코드 작성 후
LectureRepository.java 라는 인터페이스를 만들어 JPA를 사용한다.
(인터페이스는 클래스에서 멤버가 빠진, 메소드 모음집)
public interface LectureRepository extends JpaRepository<Lecture, Long> {
}
SQL이 보이도록 application.properties 세팅!
spring.jpa.show-sql=trueJPA 실행 코드
// item01Application.java 의 main 함수 아래에 붙여주세요.
@Bean
public CommandLineRunner demo(LectureRepository lectureRepository) {
    return (args) -> {
        Lecture course = new Lecture("웹개발의 봄", "남병관");
        lectureRepository.save(course);
        lectureRepository.findAll();
    };
}
실행 후 웹콘솔(H2:컴퓨터가 꺼지면 없어지는 DB) 접속 -> http://localhost:8080/h2-console
그리고 확인 ! (SELECT * FROM lecture)
H2 설정 -> application.properties에 설정 추가
spring.h2.console.enabled=true
spring.datasource.url=jdbc:h2:mem:testdb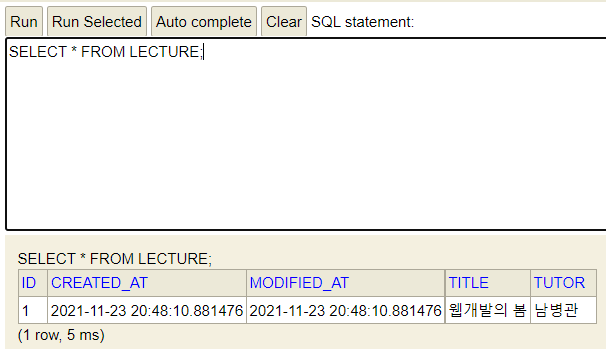
Lecture.java 파일의 Lecture 클래스 안의
getter(정보를 가져오는 메소드)는, 컬럼 설정
setter(정보를 바꾸는 메소드)는, 필드 채우기
    public String getTitle() {
        return this.title;
    }

    public String getTutor() {
        return this.tutor;
    }

public Lecture(String title, String tutor) {
    this.title = title;
    this.tutor = tutor;
✔ JPA로 CRUD 구현하기
CRUD란? 정보관리의 기본 기능
→ 생성 (Create)
→ 조회 (Read)
→ 변경 (Update)
→ 삭제 (Delete)
- 데이터 저장(C) & 데이터 조회(R)
Repository의 save와 findAll 등을 이용
// 데이터 저장하기
lectureRepository.save(new Lecture("프론트엔드의 꽃, 리액트", "임민영"));

// 데이터 전부 조회하기
List<Lecture> lectureList = lectureRepository.findAll();
for (int i = 0; i < lectureList.size(); i++) {
    Lecture lecture = lectureList.get(i);
    System.out.println(lecture.getId());
    System.out.println(lecture.getTitle());
    System.out.println(lecture.getTutor());
}

// 데이터 하나 조회하기
Lecture lecture = lectureRepository.findById(1L).orElseThrow(
        () -> new IllegalArgumentException("해당 아이디가 존재하지 않습니다.")
);
잠깐! 스프링의 구조는?
- Controller : 가장 바깥 부분, 요청/응답을 처리함
- Service : 중간 부분, 실제 중요한 작동이 많이 일어나는 부분
- Repository : 가장 안쪽 부분, DB와 맞닿아 있음
-> Update 는 Service 부분에 작성!
자바로 DB를 사용하도록 도와주는 녀석이 JPA.
그러므로 "테이블" = Domain / "SQL" = Repository(SQL문 날려줌)
- 데이터 업데이트(U)
domain 패키지 > Course 클래스에 update 메소드 추가
public void update(Course course) {
    this.title = course.title;
    this.tutor = course.tutor;
}- src > main > java > com.sparta.week02 > service 패키지 생성
- CourseService.java 만들기
@Service // 스프링에게 이 클래스는 서비스임을 명시
public class CourseService {

    // final: 서비스에게 꼭 필요한 녀석임을 명시(검색을 하거나, 업데이트를 할때 레포지터리 꼭 필요하니깐!)
    private final CourseRepository courseRepository;

    // 생성자를 통해, Service 클래스를 만들 때 꼭 Repository를 넣어주도록
    // 스프링에게 알려줌
    public CourseService(CourseRepository courseRepository) {
        this.courseRepository = courseRepository;
    }

    @Transactional // SQL 쿼리가 일어나야 함을 스프링에게 알려줌. 자동으로 DB에 반영해줌
    public Long update(Long id, Course course) {
        Course course1 = courseRepository.findById(id).orElseThrow(
                () -> new IllegalArgumentException("해당 아이디가 존재하지 않습니다.")
        );
        course1.update(course);
        return course1.getId(); //업데이트 후 어떤 데이터가 업데이트되었는지 id 반환
    }
}
데이터 업데이트와 삭제는 Week02Application.java의 main 함수 아래에 코드를 넣어 실행해본다.
- 데이터 삭제(D)
    //DELETE 해보기
   @Bean
    public CommandLineRunner demo(CourseRepository courseRepository, CourseService courseService) {
        return (args) -> {
            courseRepository.save(new Course("프론트엔드의 꽃, 리액트", "임민영"));

            System.out.println("데이터 인쇄");
            List<Course> courseList = courseRepository.findAll();
            for (int i=0; i<courseList.size(); i++) {
                Course course = courseList.get(i);
                System.out.println(course.getId());
                System.out.println(course.getTitle());
                System.out.println(course.getTutor());
            }

            Course new_course = new Course("웹개발의 봄, Spring", "임민영");
            courseService.update(1L, new_course);
            courseList = courseRepository.findAll();
            for (int i=0; i<courseList.size(); i++) {
                Course course = courseList.get(i);
                System.out.println(course.getId());
                System.out.println(course.getTitle());
                System.out.println(course.getTutor());
            }

            courseRepository.deleteAll(); //레포지터리를 통해 삭제
        };
    }
'Today I Learned' 카테고리의 다른 글
| 211129TIL_Lombok, DTO (0) | 2021.12.01 |
|---|---|
| 211125TIL_자바 완전 기초! (0) | 2021.11.25 |
| 4 Ls: 반복되는 TIL 회고를 바꿔보자! (0) | 2021.11.23 |
| 21116TIL_쿠버네티스 1 (0) | 2021.11.16 |
| 211115TIL_도커 (0) | 2021.11.16 |